As the dental profession continues to navigate through the COVID-19 pandemic with new protocols for team and patient safety, the basics of infection prevention must not be forgotten.
Foundational to patient safety and best practice is the continued quality assurance process of sterilization monitoring. Quality assurance processes and procedures are inherent to the infrastructure of all dental practice settings. These measures provide the basis for sound protocols that meet the standard of care for patient treatment as well as compliance to stated guidelines and recommendations outlined by important agencies such as the Centers for Disease Control and Prevention (CDC) and professional organizations, like the American Dental Association (ADA), the Association for the Advancement of Medical Instrumentation (AAMI) and the Organization for Safety, Asepsis and Prevention (OSAP).
The correct reprocessing of reusable dental instruments in any practice setting is the foundation for patient safety; and monitoring of this process is required to ensure certain parameters are met during the sterilization process and to directly challenge the sterilizer in killing spores. As part of the quality assurance program, the practice should comply with the CDC, which recommends three types of sterilization monitoring take place to ensure reusable dental instruments are safe for patient use; mechanical, chemical, and biological.1-3
History
The current recommendations for sterilization of dental instruments and monitoring come from a long history that dates back to Galen (130-200 AD), a Greek physician after Hippocrates, who practiced medicine in Rome and boiled instruments used in caring for wounded Roman gladiators. By the time of the Renaissance, a French physicist, Denis Papin, invented the “Digester” in 1680. This was a type of pressure cooker that worked by creating a tight seal between pot and lid, trapping the air inside the pot as it heated. As the air heats, it expands, but because it is trapped, pressure increases; and as pressure increases, so does the boiling point of the water inside. An increase of about fifteen pounds per square inch (psi) above standard atmospheric pressure
(a typical pressure-cooker setting) boosts the water boiling point from its normal 212°F to about 250°F. The superheated steam trapped in the cooker circulates around the items inside quickly penetrating them. Does this sound like the current autoclaving process? 4
In 1876, John Tyndall, an English physicist, discovered heat-resistant bacteria and later originated the method of fractional sterilization by discontinuous (intermittent) heating. In the same year, a student of Louis Pasteur, Charles Chamberland developed the first pressure steam sterilizer, or autoclave.4 By 1881, the research of Robert Koch and his team brought forth the disinfecting properties of steam and hot air marking the beginning of the science of disinfection and sterilization. They devised the first non-pressure flowing steam sterilizer and sterilization by boiling was introduced. Everything used during a surgical operation, including linens, dressings, and gowns were boiled.4
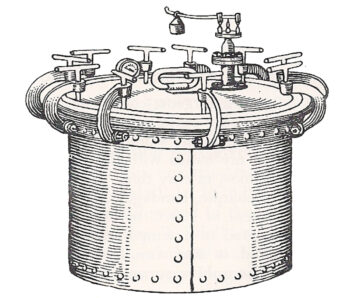
Chamberland’s Autoclave, the first pressure steam sterilizer built in 1880. Graphic from A Brief History of Sterilization4.
At this point, monitoring or evaluation of the sterilization process was not performed, it was assumed based on the science of the day, that bacteria and any dangerous pathogens were being inactivated and killed. Fast forward to today and the quality assurance measures that are utilized for assessment of the sterilization process – monitoring. Mechanical Monitoring The first type of monitoring is mechanical. Mechanical techniques for monitoring comprise evaluating the cycle times and temperature – or pressure, reached in the sterilizer by actually viewing the gauges or displays on the machine. Many of the newer model sterilizers have computerized recording type devices, such as flash-drives which can provide printouts of stored information related to mechanical monitoring.
Dental team members should know the correct readings for all sterilizers so inconsistencies are easily recognized and addressed. Mechanical monitoring does not confirm sterilization; however, incorrect readings can be a first clue for sterilizer malfunction.1-3 Dental team members must remember mechanical monitoring has to do with the processes occurring inside the sterilizer chamber, rather than the conditions of the packages, pouches, or cassettes. Mechanical monitoring will not detect problems resulting overloaded sterilizers, improper packaging materials, or use of closed containers.5
Chemical Monitoring
Chemical monitoring should be implemented on a routine basis. The goal of chemical monitoring is to determine whether instrument packages – including the instruments inside these packages – have been exposed to the sterilizing conditions.5 Chemical indicators (CIs) change color or physical form when a certain parameter is reached inside the sterilizer. Heat or chemical-sensitive inks in the indicators change color when one or more sterilization parameter (e.g., steam-time, temperature, and/or saturated steam; ETO-time, temperature, relative humidity and/or ETO concentration) is present.3 Chemical indicators are available in different designs, including tape, strips, and special markings on packaging pouches.
The CDC states, “a chemical indicator should be used inside every package to verify that the sterilizing agent (e.g., steam) has penetrated the package and reached the instruments inside. If the internal chemical indicator is not visible from the outside of the package, an external indicator should also be used. External indicators can be inspected immediately when removing packages from the sterilizer. If the appropriate color change did not occur, do not use the instruments. Chemical indicators also help to differentiate between processed and unprocessed items, eliminating the possibility of using instruments which have not been sterilized.”2
Chemical indicators should not replace biological indicators, as only a biological indicator consisting of bacterial endospores can measure the microbial killing power of the sterilization process.6
The AAMI offers the following table to explain the six types of chemical indicators.7 It is important that all dental team members are trained on the chemical indicators being used in their dental practice.
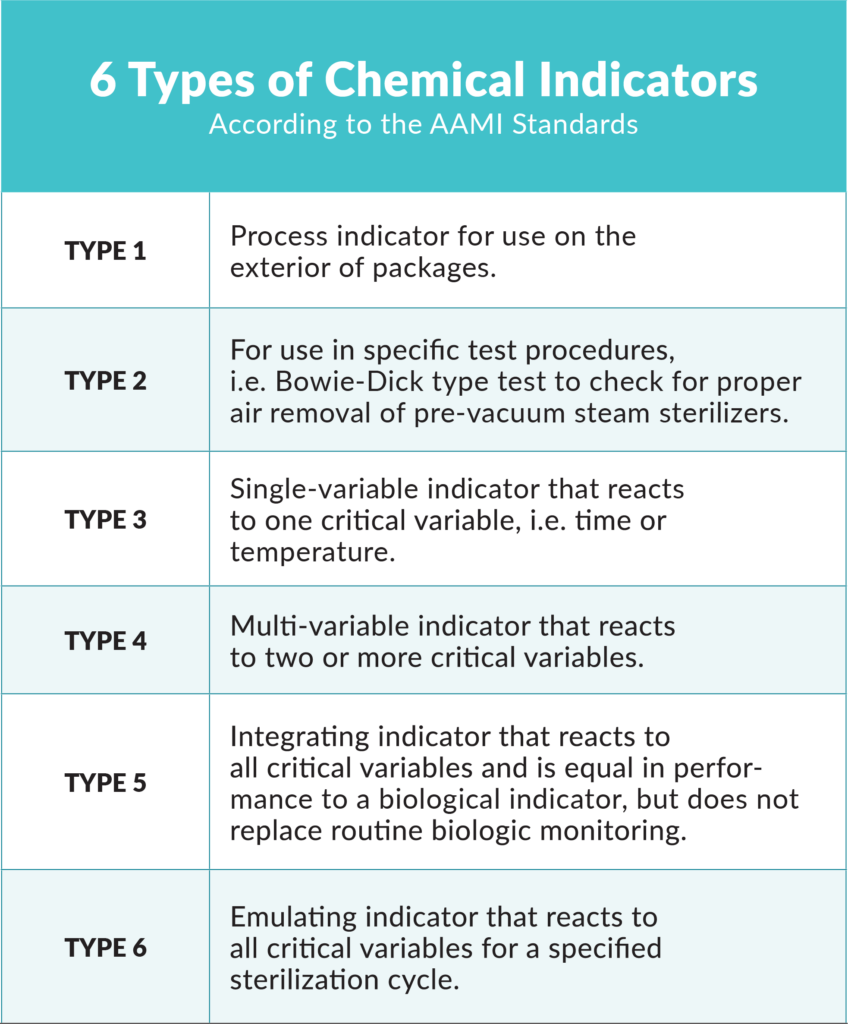
ANSI/AAMI ST79:2010/A4:2013 Comprehensive Guide to Steam Sterilization and Sterility Assurance in Health Care Facilities bit.ly/GuideToSteamSterilization.
Many dental professionals and staff are familiar with autoclave tape from dental school or their training programs. Autoclave tape is often used on the external packaging of wrapped cassettes or instrument packs. The tape is considered a Class-1 chemical indicator and usually reacts to one variable: temperature/heat. Using only a Class-1 tape chemical indicator on the external packaging does not meet the full requirements for chemical indicator protocols established by the CDC.1-3 Also, this type of external chemical indicator does not indicate sterilization – let alone a complete sterilization cycle – has occurred. For instance, it’s possible the sterilizer reached the appropriate temperature and then immediately malfunctioned after the chemical indicator already changed color.5
In addition to the Class 1 chemical indicators, other types of chemical indicators commonly used include the multiparameter CI, which may be a Class-4 reacting to more than one parameter (time, temperature or the presence of steam), and the integrating CI, which is a Class-5 reacting to all three parameters. Many manufacturers make dual-indicator pouches, which have both internal and external Class-4 CIs built into the packaging, meeting the criteria set by the CDC. Integrating chemical indicators in the form of strips should be used for cassettes and are available through a variety of vendors. Integrating indicators should be placed inside the cassette prior to placing it in a large pouch or wrapping. After opening each processed pack, pouch or cassette, the dental team must immediately observe the internal chemical indicator. If the appropriate change has not occurred, the sterilizing agent has not penetrated the packaging material or the package has not been processed through the sterilizer,5 and the items should not be used on a patient.
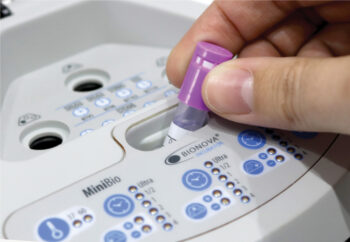
The Terrangene Mini Bio can provide test results in as quickly as 20 minutes.
Biological Monitoring
Sterilizer monitoring – together with the proper sterilization of instruments and materials – is an essential part of any in-office infection control program,6 according to the ADA. Biological indicators (BIs), or spore tests, are the only process indicators that directly monitor the lethality of a given sterilization process. Spores used to monitor a sterilization process have demonstrated resistance to the sterilizing agent and are more resistant than the bioburden found on medical devices. B. atrophaeus spores are used to monitor ETO and dry heat, and G. stearothermophilus spores are used to monitor steam sterilization, hydrogen peroxide gas plasma and liquid peracetic acid sterilizers.3
Biological monitoring should be completed on a weekly basis1-3,5-7 and results should be logged. Maintaining accurate records ensures cycle parameters have been met and establishes accountability in the practice.2 Dental team members responsible for conducting weekly spore testing must be trained and take their responsibility seriously. Many larger practices and DSOs have dedicated sterilization staff to carry out these duties, which helps to ensure consistency and calibration positively impacts patient safety. Instructions for use (IFU) should be followed for the specific BI used in the practice and both the control and test BI must be from the same lot number. Miller outlines the general procedure for use of BIs5:
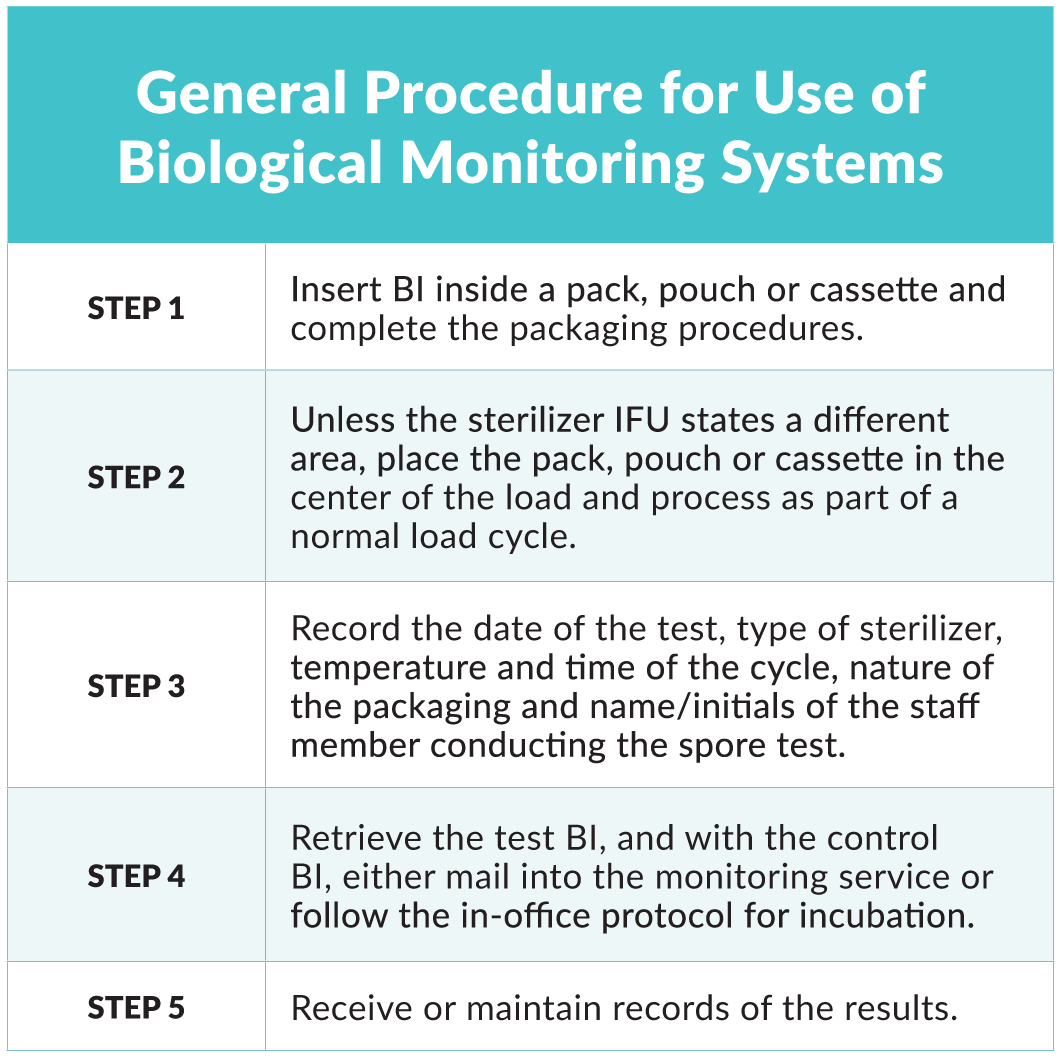
Biological monitoring should also be completed:7
- The first cycle after repair of a sterilizer, release the load only after a passing BI; AAMI recommends three passed BIs before putting the sterilizer back into service
- On all implantable devices, this is not applicable for most dental settings as implants are delivered sterile by the manufacturer
- At the initial use of a sterilizer
- During the training of new staff
- When a loading procedure has changed
- When processing hazardous waste on-site
The CDC provides an example of three years for maintaining sterilization records, but also suggests checking for any local or state regulations which may apply.3
Biological monitoring can be completed via a mail-in service or in-office system. Mail-in services involve subscribing to a service from a company or sometimes a dental school.1, 3, 5 The service usually provides the spore test strips made of paper that contain the challenge spore. After processing, the strips are sent via US mail to the monitoring center for analysis.
There are numerous disadvantages of utilizing a mail-in service. What if the package is lost in the mail? What if the package is damaged in the mail? What if the there is a BI failure and now due to the time it has taken to arrive via mail, days have passed since results are obtained? A more efficient, and expedient approach is an in-office biological monitoring system.
Terragene Mini-Bio
In this in-office biological monitoring option, weekly spore test results demonstrating the effectiveness of the sterilizer to kill spores is immediate and provides an avenue to address any failure directly. A new in-office product is the Mini-Bio manufactured by Terragene. The Mini-Bio incubator uses a fluorescence reading system to analyze the spore vials that are used.
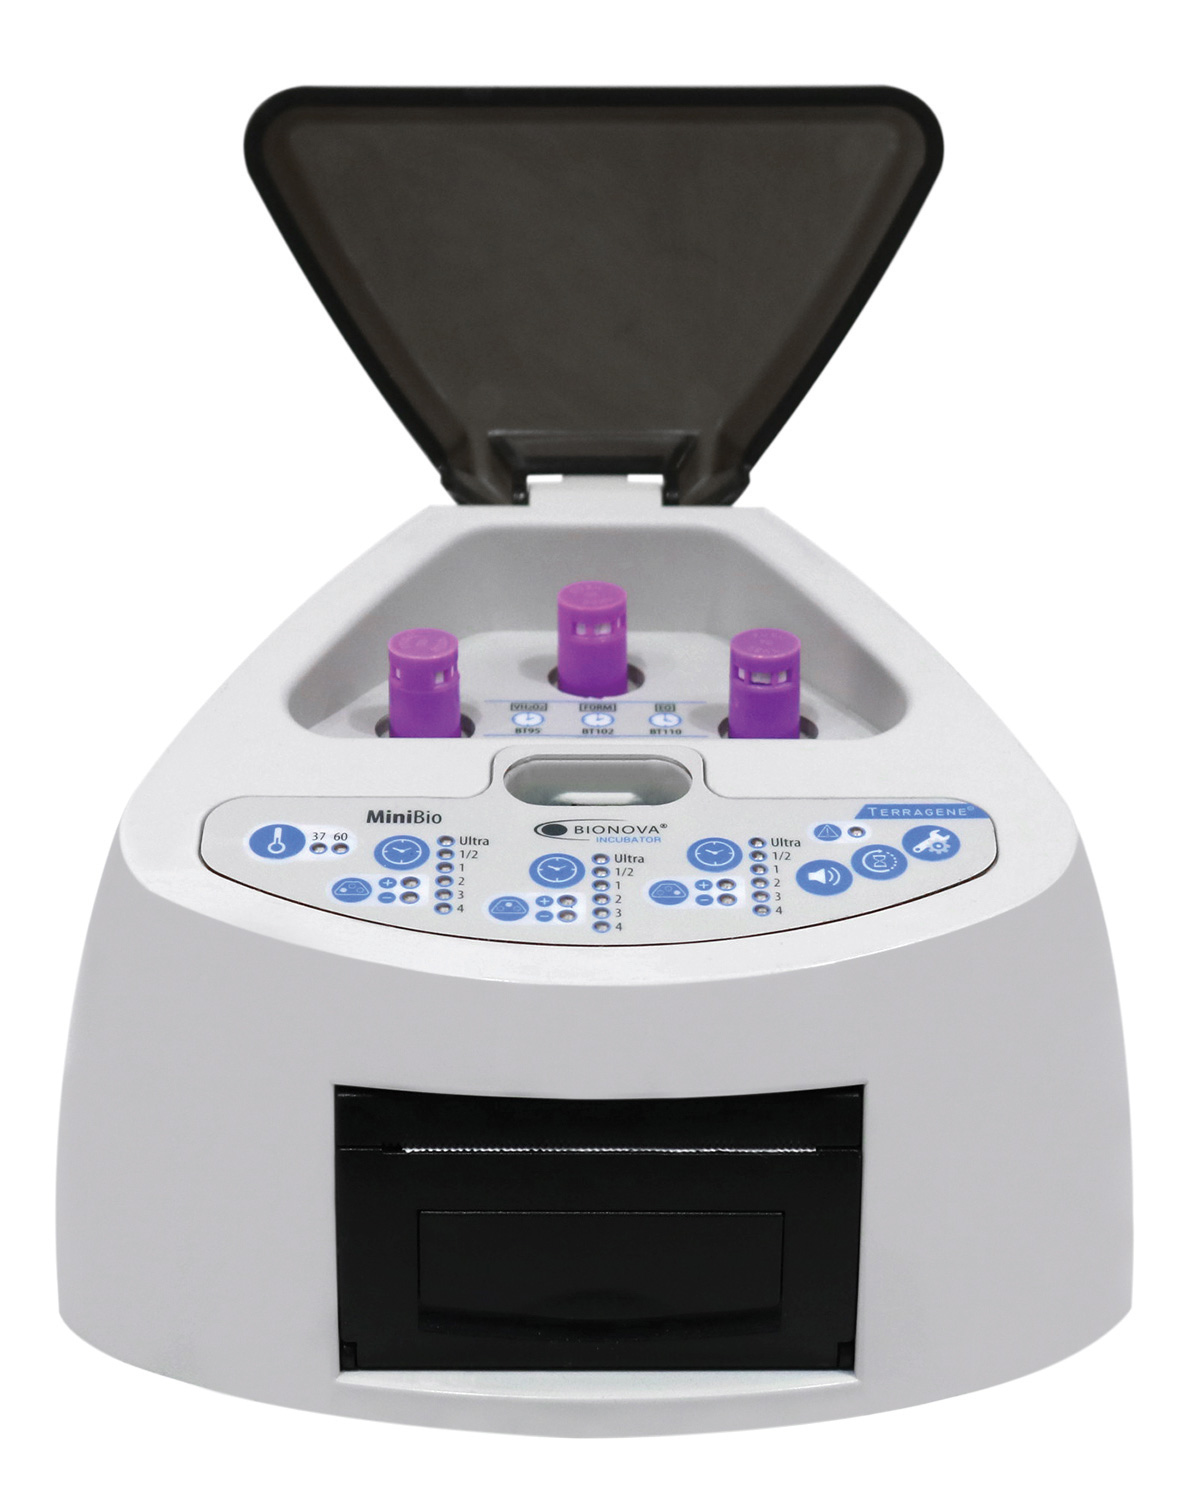
Terrangene MiniBio
It also provides spore test results in varying time intervals depending on the vial chosen, but results can be obtained in as quickly as twenty minutes. The results are presented via Mini-Bio’s thermal printer and can be synced with Bionova software. In a time when infection control is a high priority, quick results are vital to safe patient care and practice.
The three types of sterilization monitoring all play an important role in the quality assurance program of the practice. Dental team members must be well trained and have a clear understanding of these procedures and rationale to carry out these tasks that highly impact patient safety. Although the COVID-19 pandemic has necessitated significant changes in dental practice thus far, processes such as sterilization monitoring remains a constant and important quality assurance process.
Resources
- Centers for Disease Control and Prevention. “Guidelines for Infection Control in Dental Health-Care Settings” — 2003. MMWR 2003;52(No. RR-17); 24-25.
- Centers for Disease Control and Prevention. Summary of “Infection Prevention Practices in Dental Settings: Basic Expectations for Safe Care”. Atlanta, GA: US Department of Health and Human Services, Centers for Disease Control and Prevention, National Center for Chronic Disease Prevention and Health Promotion, Division of Oral Health, March 2016.
- Centers for Disease Control and Prevention. “Guideline for Disinfection and Sterilization in Healthcare Facilities” (2008); last update: May 2019. Accessed May 13, 2020.
- Skellie B. “A brief history of sterilization”. Accessed May 15, 2020.
- Miller CH, Palenik CJ. “Infection Control and Management of Hazardous Materials for the Dental Team”. 5th ed. St. Louis: Mosby Elsevier; 2013; 135-141.
- American Dental Association. “Oral health topics – infection control”. Accessed May15, 2020.
- Organization for Safety, Asepsis and Prevention. “OSHA and CDC Guidelines; Combining safety with infection control and prevention for Dentistry”. Interact Training System; 5th Ed, 2017.

Dr. Katherine Schrubbe, RDH, BS, MEd, PhD is an independent compliance consultant with expertise in OSHA, dental infection control, quality assurance and risk management. She is an invited speaker for continuing education and training programs for local and national dental organizations, schools of dentistry and private dental groups. She has held positions in corporate as well as academic dentistry and continues to contribute to the scientific literature. Dr. Schrubbe can be reached at Kathy@SchrubbeCompliance.com.
Permission to publish provided by Terragene.
![]()
Published in TIPS – November/December 2020.
Category: Merchandise
Back to Articles