State of the art materials & techniques increase predictability.
Taking an impression for a crown or bridge can be one of the most challenging aspects of general dentistry and the success of our restorations is dependent on the accuracy and quality of this process. To obtain crown and bridge impressions can be among the most challenging aspect of general dentistry and the success of our restorations is dependent on their accuracy and quality. To obtain a flawless clinical impression, the practitioner must employ sound clinical techniques using highly accurate materials. There are many different materials and techniques commonly used in restorative dentistry.1 This article will discuss a simple two-step technique for capturing flawless impressions that has been shown to be highly accurate and reliable.2
When selecting an impression material for use in clinical practice, several factors must be considered including accuracy, total setting time, working time, and hydrophilicity of the given material. Several advances in product development have lead to impression materials, such as the ones used in the following case, that offer longer working times with decreased overall setting times. By decreasing the time the material sits in the oral cavity after it has been expressed and inserted, the potential for distortion is lessened.
Case Presentation
The patient presented to a recall examination with radiographic distal decay under an existing crown restoration on the left maxillary second bicuspid (i.e. tooth No. 13 – Fig. 1). The accepted treatment plan involved removing the existing crown and distal decay and then replacing the failing crown restoration with a new ceramic crown. Prior to crown removal, a preoperative alginate quadrant impression was made. If time permits, this impression can be captured at the hygiene appointment. For this case, the alginate impression was captured at the preparation appointment, and a fast-setting stone was poured to create a corresponding model (Fig. 2).
 Fig. 1 Radiograph of tooth No. 13, showing distal decay Fig. 1 Radiograph of tooth No. 13, showing distal decay |
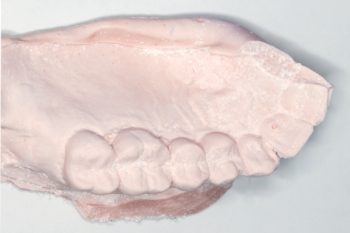 Fig. 2 Preoperative study model Fig. 2 Preoperative study model |
|---|
The model was used to create a vacuum-formed splint to fabricate the provisional as well as to customize a stock impression tray for a two-step impression technique. To customize the tray, a fast-setting vinyl polysiloxane (VPS) impression material (V-Posil Putty Fast, VOCO) was mixed & placed into the tray, then pressed against the stone model (Fig. 3). At the crown preparation appointment, the failing crown was removed and the distal decay was cleaned. The preparation was then modified and refined. A dual-cord technique was utilized (Ultrapack® #00 and #1, Ultradent Products Inc.) to achieve retraction, and a 20% ferric sulfate hemostatic agent (Viscostat®, Ultradent Products Inc.) was used to control any bleeding and further facilitate adequate tissue retraction.3 The cords were left in place for approximately 5 minutes (Fig. 4).
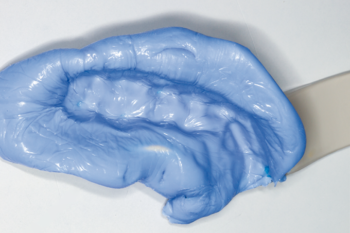 Fig. 3 Stock quadrant tray customized with fast-setting VPS material Fig. 3 Stock quadrant tray customized with fast-setting VPS material |
 Fig. 4 Retraction cord in place for dual-cord technique Fig. 4 Retraction cord in place for dual-cord technique |
|---|
Prior to removing the top cord, the entire operating field was rinsed with copious amounts of water to remove any debris. After the top cord was removed and an inspection of the site confirmed adequate retraction and hemostasis, the preparation was thoroughly dried (Fig. 5). A single use impression syringe and the previously customized impression tray were loaded with a VPS wash material (V-Posil Light Fast, VOCO) (Fig. 6).
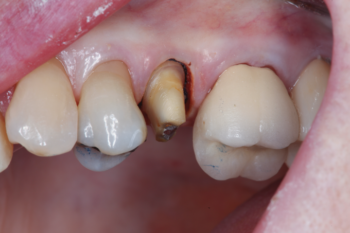 Fig. 5 Dried field with top cord removed – ready for final impression Fig. 5 Dried field with top cord removed – ready for final impression |
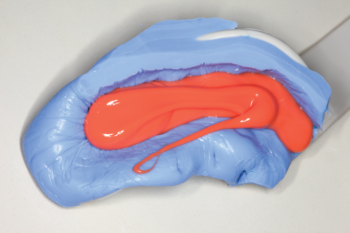 Fig. 6 Customized tray loaded with VPS wash material Fig. 6 Customized tray loaded with VPS wash material |
|---|
The wash was injected around the prepared tooth, paying careful attention to deliver the material into the retracted sulcus to ensure the presence of adequate flash and marginal detail. Upon removal from the oral cavity, the impression was examined to ensure that all necessary details had been captured. First, the impression was examined for overall accuracy and the level of detail of the adjacent teeth. This included all of the occlusal, lingual and proximal surfaces (Fig. 7). Then, surgical loupes were employed during the next phase of assessment, allowing a more detailed inspection of all of the axial surfaces and circumferentially at the margins. (Fig. 8 and Fig. 9).
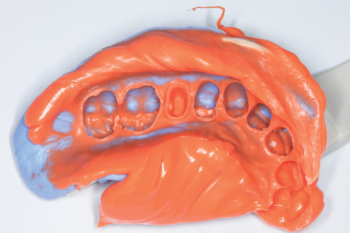 Fig. 7 Full view of final impression Fig. 7 Full view of final impression |
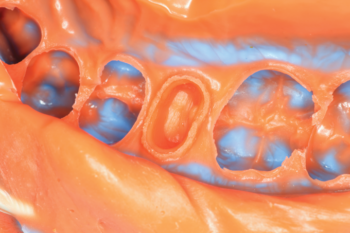 Fig. 8 Detailed view of the facial and distal margins Fig. 8 Detailed view of the facial and distal margins |
|---|---|
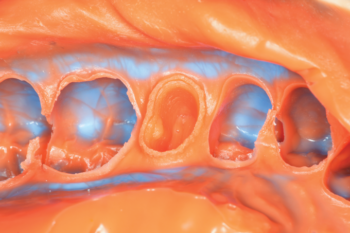 Fig. 9 Detailed view of the lingual and mesial margins Fig. 9 Detailed view of the lingual and mesial margins |
Conclusion
Although capturing a flawless impression can be a daunting clinical challenge, the use of well-engineered materials and careful attention to technique can make the process very predictable.4 Regardless of the amount of steps used in the impression method, the employment of proper retraction using a dual-cord technique will lead to improved overall clinical performance. The V-Posil impression system utilized in this article employs a thermo-activated process to decrease the setting time with no overall impact on the working time – an advancement in the engineering of impression materials that benefits both the practitioner and the patient.

Written by Marc Geissberger, DDS, MA
Published in TIPS – July/August, 2019. Originally published in Inside Dentistry. Copyright © 2019 to AEGIS Publications, LLC. All rights reserved. Used with permission of the publishers.
SOURCES
1. Rubel, B. S. Impression Materials: A Comparative Review of Impression Materials Most Commonly Used in Restorative Dentistry. Dental Clinics. July 2007. Volume 51, Issue 3, Pages 629–642.
2. Ladan Jamshidy, Hamid Reza Mozaffari, Payam Faraji, Roohollah Sharifi. Accuracy of the One-Stage and Two-Stage Impression Techniques: A Comparative Analysis. Int J Dent. 2016: Nov 24.
3. Chai J, Takahashi Y, Lautenschlager EP. Clinically relevant mechanical properties of elastomeric impression materials. Int J Prosthodont. 1998 May-Jun;11(3):219-23.
4. Devan, M.M. Basic principles in impression making. J. Pros Dent. June 2005 Volume 93, Issue 6, Pages 503–508.
Category: Merchandise
Back to Articles